
 In the Northeast it is time to start thinking about shooting the Fall colors. If you live here you probably have already picked out some of the places to take pictures, but if traveling there are a number of things you can do to choose locations. First, you need to see how far along the color change has progressed in the different parts of the country. My favorite place to look is the Foliage Network. They have information posted by volunteers in the Northeast, Southeast & Midwest US. A sample post for September 6th, 2008 shows we still have plenty of time before the leaves change. Towards the peak of the seasons the Foliage Network updated their maps a couple times per week. They also have data for the last couple of years so you can estimate a general time to plan your visit to an area.
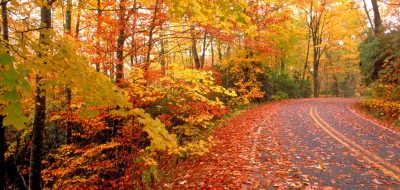
Some of my local favorites include a nature sanctuary, The Sterling Nature Center, a location I usually go for photographs of Great Blue Herons. Although by this time of the year the young herons have fledged the nest & moved on, the beaver pond and surrounding woods offer much to photograph. Another local favorite is a visit to one (we only have two) of Oswego County’s waterfalls – Salmon River Falls. Below is an image from the stream above the falls.  If you are not familiar with the area you are heading for, not only do you need to determine when to visit, but where to shoot. Some of the best ways to pick out “where” is to use an image search browser such as Google, Yahoo or Microsoft’s Live Search to find photographs taken in the area you plan to visit. A search for Fall + Colors + the location will often give you some useful results. If you are lucky, the photographer will have not stripped the EXIF data from the image so you can check the date the photograph was taken. If you are real lucky, the photographer will have included the GPS coordinates of the camera location. If you are interested in extracting the information from an image, the full sized version of the following image contains GPS data. Copy the data & paste it into either Google Earth or Google Maps. You may need to convert the data – a useful site to do the conversion as well as link to many mapping sites is GPS Coordinate Converter, Maps & Info. Can you can identify the location where I took the photograph?
 Although not all cameras record GPS information to the EXIF data, it is becoming a popular feature on some new point & shoot cameras & has been an option on many DSLRs. As I described in an earlier article, if you have a portable GPS that is capable of downloading tracks, you can turn it on while you are taking photographs, download the track to your computer & use syncing software to add location data to any image’s EXIF data. Some editing software & some internet photo sites strip EXIF data from your images – if you want to make the information available to others make sure it is still attached to your images when you publish them.
Some general tips for Fall Foliage images:
- Try to shoot during the “Golden Hours,” the hour after sunrise & the hour or so before sunset. Although these are always good times for landscape photography (that is why they are called the golden hours) the warmer sunlight brings out the colors of the leaves.
- If possible, be prepared to use a graduated ND filter to control the balance between the sky & the land. The sky is often so much brighter than the foliage that keeping both properly exposed is difficult. If you don’t have the filter, use a tripod, shoot two exposures, one for the sky & one for the land, and use HDR software to combine the images.
 A Polarizing filter is useful for adding color to the sky, however be careful if you are using very wide lenses – the filter will not evenly color the sky. This image was shot with a 17mm lens & the actual sky was evenly blue. Another use of the polarizing filter is when you photograph a stream or pond with good looking rocks or structure on the bottom. Without the filter the surface reflects causing glare. With the filter (adjusted for clarity) the sub surface becomes part of the image. I have more information on both types of filters in this article.
- If you want “natural” images, watch for vapor trails in the sky. It is amazing to me that they seem to always manage to work their way into an otherwise natural image!
- I mentioned using a tripod for making HDR images – it is also necessary if you want to shoot softly blurred waterfalls, streams and ponds. The combination of water & Fall colors works well; the long shutter speeds necessary to soften moving water require a tripod. One note – if it is windy, the long exposures necessary to blur the water will also blur the leaves on the trees. Although this can be an interesting effect, it can also turn your photograph to “mush.”
- Really look at the image before taking the photograph. The colors can be beautiful, but your eye (well, actually your mind) will filter out the telephone poles, power lines, buildings, cars, etc that detract from the image. Take an extra few seconds to be sure the camera image is what you see with your eyes.

Although it is possible to take wonderful scenic photographs any time of the year, the Fall is my favorite, and you don’t need a fancy camera to take them!
Jim Burnett
Jon –
Thanks for some excellent, and very practical, tips. The link to the Foliage Network is a real plus, too.
I agree with you – Fall is my favorite season for outdoor photos.