
Many of us never print images, preferring to view them on computer screens, TVs or digital picture frames. Even when we do print, it is often as 4″X6″ photos that are given to friends & relatives that don’t have email or computers. If you have a photo ink jet printer, unless is is one of the few designed for large prints, you are probably limited to 8″X10″ as the largest size you can print. Every once in awhile, you may decide you want a larger print. A 16″X20″ or even 20″X30″ print mounted on foam core is light enough to hang on the wall of any RV, and a wonderful reminder of friends, family or places you have visited. If you do sessions at workshops, they are useful to illustrate your discussion. There are many contests all over the country that offer chances to exhibit your work; even win prizes or money, that require large prints.
So, can you make one from your digital camera file?
It is a difficult question to answer, because although it is always physically possible to make any size print from any size data file, whether is it worth doing is subjective.
First, there is the cost to consider. At one time a 20″X30″ print was so expensive that it was rare for anyone to print them. When I worked for a Theatre Department, as we shifted from hand drawn drafting to CAD we had to purchase a large format printer to replace an obsolete Diazo copy making system that produced dangerous fumes (It used & vented to the room the same strength ammonia used in RV refrigerators). The printer was around $16,000, but less than the cost of adding outside ventilation for the old machine. Of course, as the department photographer I was ecstatic – although the main purpose of the printer was to produce black & white mechanical drawings, when using photo paper it made excellent 42″ wide color photographic prints. Unfortunately, they faded to unusable quality in 6 months or so under fluorescent lighting, but that’s another story.
Although it is still quite expensive to purchase a printer that will print 20″X30″ or larger photos, they are far less expensive than they were just a few years ago. For around $2500.00 one can now purchase a 24″ wide printer that uses pigment based ink that produces beautiful, fade proof color prints. Still, that’s a lot of money unless you are making a living selling prints. On top of that, these printers are not practical for the RVer. They are huge, very heavy, and if not used regularly, often clog, wasting expensive ink cartridges.
A much better approach is to use printing services. Your nearest Costco, Walmart, Staples, etc is likely to have large format printers, will often laminate & dry mount your print on foam core, and do it for less than an 8″X10″ cost a few years ago. What’s more, they can produce a finished print in a day or two, and sometimes in a couple of hours. Our local Staples will make a good quality print for $5.60 per square foot. A 20″X30″ print would run about $19.17. Laminated & mounted on foam core, the print will cost you $43.38 including tax (here in NY that’s 8% ). If you don’t have a near by store with a large format printer, companies such as Mpix will produce a 20″X30″ print for as little as $24.99 plus shipping. You also have many choices for paper types, mounting, even frames, of course for an additional cost. I use them & their quality is excellent. So, it you are interested in producing a large print ready for framing, or, dry mounted to foam core, ready to hang on the wall, there are lots of ways to do it.
Back to the question – is it worth making a large print from your image file?
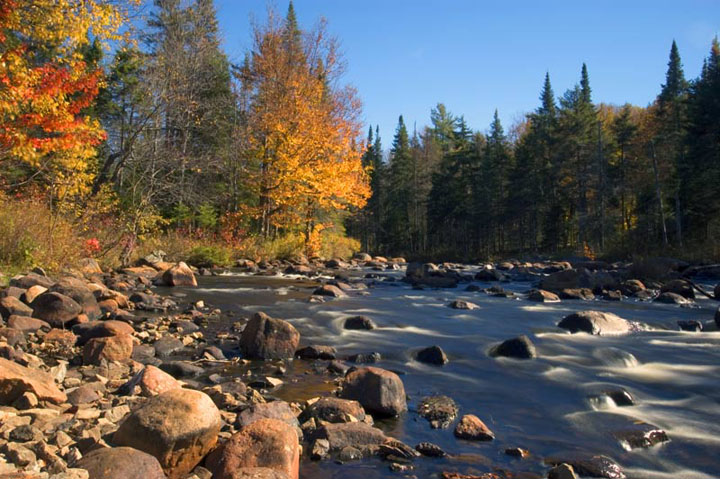
 One of the first things to determine is the viewing distance. Since the image is made of pixels or individual picture elements, the further away the viewer gets the more they blend together. A low resolution image works well on a billboard because drivers are viewing it from 100’s of feet away. A photo in a display booth that keeps the viewer at a distance will work at a lower resolution than one that is viewed from a foot away. These two images are the same, however the first was saved at 72dpi, the second at 20dpi. If you click on the images to view them in full size the difference between the two is obvious, however if you look at them from 15′ away, it is difficult to tell the difference.
If your viewer is going to be standing a foot or less away from your print, according to Thom Hogan, who runs a very useful website called byThom, a resolution less than 180dpi will result in a poor quality print, 180dpi – 278dpi a good print & 288dpi + an excellent print. His table at “How big can I print?”points out that you need a 21MP camera (5616 X 3733) to produce even a poor (156dpi) 24″X36″ print. Since many of us have printed quite acceptable large images from cameras with a sensor resolution of 8 – 12MP or less, something seems wrong. If you read the complete article, Thom points out that a good original can be doubled or more in size without losing quality. Although Photoshop & Photoshop Elements does a good job enlarging your image files, there is software designed specifically to produce large images. Check Genuine Fractals, Blow Up, and PhotoZoom for example. Thom points out that you need a high quality original if you expect it to enlarge. This is one of the reasons I suggest always setting your camera on its highest resolution & largest file quality. You never know while taking your images which will become a print worth enlarging. If you don’t feel you will get enough images before needing to replace your data card, purchase a larger or better yet, a second, third or more storage card and change them as they fill up. Data storage cards & disk space are inexpensive – you can always reduce quality to save space when mailing, etc., but you can’t get back what you never recorded in the first place.
One solution to help determine whether or not your file will make an acceptable print is to have a sample printed before you go for the large print. By printing a 4″X6″ or 8″X10″ section of your full size print you can evaluate the quality without paying for a full size print. Choose a section that includes fine detail as well as sections of sky or other parts that will show subtle graduations of color. Just be sure who ever is doing your printing uses the same printer for the sample that they will use for the full size print. Our Staples, for example, has a couple of printers, and unless you ask, will print smaller images on a different printer than their 36″ machine. If you are not moving around, try to establish a relationship with the people running the printers. They can often be talked into reprinting a file if you find problems, provide some flexibility in printer choice, and help filling rush orders, etc.
So, although it is possible to make large prints from any image file, you will be more pleased with the results if you make careful choices & use good techniques preparing the files.
Pingback: handyman denver
Pingback: anchor gloves
Pingback: no approve
Pingback: ניסור בטון