I’ve learned some good stuff on boondocking and dry camping. Us with trailers hate to have to hookup to go dump and take on water etc right? Well there actually in most case is no need to go through all that. You can go indefinitely without hooking up and re-setting up your trailer/RV in most cases. Below are some suggestions that work real well that I learned on my first trip to Quartzsite Arizona and boondocking in the desert.
They apply just about to all dry camping experiences providing there is a dump station and place to get water within a reasonable distance. This applies basically to those with pickups, MDT and HDT tow vehicles. It might be practical with SUV’s as well. In this tip I’ll mainly deal with pickups. In the case of other than truck type vehicle a “bladder bag” type container will work.
First thing is to get a fresh water tank to place behind the cab of your truck. I prefer the 35 gallon size. It’s up to you and depends on what the largest size tank you can fit or want. From there you get a 12 volt pump to pump the water into your trailers fresh water tank. This solves the issue of having to haul your trailer to a dump station to take on water. You simply drive your tow vehicle to the dump station to fill the portable tank in the bed of your truck. No need to hookup and drag the trailer down there.
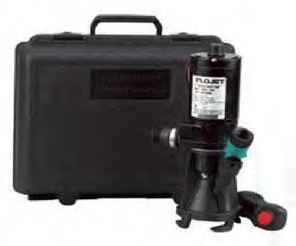
Now you ask OK, but what do I do about emptying the tanks? This is an easy task. You get a Macerator pump and attach it to the dump valve on your trailer. From there you pump your gray and black water into a tote also in the back of your tow vehicle. I prefer the 32 gallon size tank and they have a dump valve like the trailer on the side so you simply hook up a sewer hose to the tote and the other end goes into the dump.
Each time you go somewhere you can simply pump your gray or black water into the tote with your Macerator pump. The black water does not need to be dumped as often so most of the time it’s the gray water. You can dump as often as you like or practical. Cost for everything is approximately $500, but if you dry camp or boondock this is relatively cheap and saves you a whole lot of work in hooking up and hauling the trailer to a dump station and back.
The Macerator pumps will usually pump up to 12′ in height and distance is not a problem unless you exceed a run of 40′ or so. Most of the time you’ll only be pumping maybe a 15 to 20′ distance and a height of maybe 5′ so it works great! The easiest way for me to run the 12V to the fresh water pump was a cord with a cigarette lighter adapter and a plug at the pump where you can hook and unhook the 12V cord.
There are numerous easy ways to accomplish this though. There are many different products that can be used for this and these listed are just mine. Many may know of this tech tip, but for those new to RV’ing or dry camping it’s great as I found out early on. As with all my projects they are annotated in my RV Notebook software in the finance and maintenance sections where I really realize my savings and track them. That makes the projects/mods even more fun. Even projects like this are great money and time savers!
| Items needed… * Macerator pump..  |
* The macerator pump allows me to simply pump my holding tanks into the Blue Boy tote and haul it to a dump station. * Fresh water tank from Loomis Tank Center in Paso Robles and the 12 volt Shureflow pump allows me to haul fresh water back to the rig and fill my fresh water tank. This is basically the same type pump in our RV’s and mine pumps about 3 gpm. |
 |
 |
| Tote.. (I have two equaling 37 gallons). Both have side dump valves I installed for very little expense which eliminates the need to tow or lift the totes. If the dump station requires a drive on public roads you can’t tow it behind you anyway. Due to a family member illness I was forced to dry camp for 6 weeks at one location and never had to hookup once. It made life so much easier. |
 |
| ——————– |
 |
| Check out Firedude’s eBooks and adventures on CD here! |
 |
| The best RV management software out! Use the best! |


Pingback: sims 4 keygen
Pingback: toby black empower network click here
Brian
Very good stuff regarding the use of the water tank and sewer tote. We are new to rv’s so just learning. We will be boondocking 100% of the time, and have a question regarding the use of the blue tote. Could the blue tote be replaced by a 2nd leg type tank, just like the one used for fresh water? I will be hauling the tanks back to our home, where I will fill the fresh water tank. However, for the purpose of making life easier, would is work to use the macerator to pump the grey and black water into the second leg type tank? Then, when arriving home, hooking a garden hose to the tank, and draining directly into our home’s sewer clean out access? Would this work, therefore avoiding the need for the rv sewer hose attachment altogether? Also, if needed, could you use a separate pump, to pump the grey and black water into our home’s clean out. I am thinking gravity will take care of this, but just in case, was wondering if the pump would work for greay and black water as well?
Thanks
Brian
Don Hale
Just starting to learn about dry camping
Pingback: Installing a 3″ dump valve in a blue tote, life made easy. : blog.rv.net: RV and Camping News and Information
Pingback: RV Weekly Round-Up (June 6-12, 2009) : blog.rv.net: RV and Camping News and Information
Paul Hanscom
Very good simple setup. You can eliminate the fresh water pump if the water tank in your truck is higher than the trailer water tank. Just let if gravity feed. If that does not work or you want faster flow, you can utilize the rv pump by modifying the plumbing. You just need a couple of Tees and a couple of valves to install a bypass line and a suction line that will pump the water back into the RV tank.
Tony Cornett
Stan pretty funny stuff LOL! I guess i know my “stuff” eh? 😉
Rick…. The fresh water tank was $85, but you can get them cheaper other places. The macerator pump was $220, the Shureflow fresh water pump was $59 and the misc fittings were only pennies.
I had the 2 blue totes already, but put the knife valves in the sides at a cost of $16 each so the whole deal minus the totes them selves was around $400 plus the totes I already had. a lot of people who’ve gone my route just got the one 32 gal tote with the valve already in it, but since i couldn’t lift the full totes and couldn’t see wasting the the money to buy new ones I simply installed the valves in the ones i had. The time and effort saved in hitching up , going to the dump and coming back and setting back up was well worth it. i figured the first couple time it paid for itself in time and effort.
As mentioned when I had to dry camp near a hospital for 6 weeks for a family illness it was worth it’s weight in gold, way beyond the initial cost. I never had to hitch up once. 🙂 If you dry camp or boondock the setup is a life saver. It’s a fantastic setup and makes things virtually effortless compared to the conventional stuff and as stated in my case was a life and time saver during an emergency.
I accumulated the stuff over time so it didn’t break the bank all at once.
My next blog will be putting the side dump valves in the blue totes for those that don’t have the dump valves….
Tony
Rick Vogel
Tony what did all those tank’s & hose’s and Macinator cost you! Good Idea if it dont Break the bank? Rick Vogel U.S.Army Retired I Use only National campground’s with-Hook-up’s any way! But just wondering How much you had tied up in this thing? Rick Vogel U.S.Army Retired!
Stan Wenquist
Yep, you just proved it. Ya gotta know your S**t to be an RVer