Hi Mark My Words readers! This month we’ve got questions on bike carriers and water pump problems, and tips on surviving the winter in your RV. Remember to send your RVing questions to [email protected].
Hello Mark,
We have a ford expedition and a hybrid travel trailer. We’d like to take two bikes with us and aren’t keen on putting them inside the camper because they scratch up things, get grease on stuff, etc. We also can’t put the bikes behind the camper because that’s where our tip out is. We would like the bikes to be attached to the car so that we can drop the camper and go somewhere with the bikes. We saw one guy mount two bikes to the front of his vehicle by adding a trailer hitch to the front. That seems buggy, limits visibility and partially blocks the headlights. We’d really like to have the bikes in between the truck and camper. We’ve seen a dual receiver extender and wonder if that could work. I can find very little information on people putting their bikes in between vehicle and camper and attached to the car, rather than attached to the camper.
Any advice?
Linda
Hi Linda,
It is possible to use a hitch receiver extension/adapter to allow you to mount a hitch receiver style bike rack and still hitch up your travel trailer. However, there are considerations: You must take into account the additional weight and make sure that the addition of the extender and the bikes and rack don’t exceed the vehicle’s weight and carrying capacity limits or the hitch’s weight ratings. That means that you need to add up the trailer’s tongue weight and the weight of the bikes and carrier and compare that weight against the tongue and total trailer weight ratings on the hitch receiver. It’s also important to consider the added weight on the tow vehicle. Never exceed weight ratings, it’s just not safe.

Photo: MaBraS/Pixaby
If your trailer requires an equalizing hitch, or anti-sway gear, then you must make sure that the extension and bike rack won’t interfere with those components. Also, adding an extension on the hitch receiver puts the ball further behind the tow vehicle. This can change the way the trailer backs up and handles, but it’s usually not a major difference.
Finally, with the bike rack and bikes in place and the trailer hitched up, check to be sure that turning, backing and maneuvering won’t cause the bikes or rack to bind or pinch the front of the trailer. I expect that the bike rack will prevent you from opening the rear hatch on the tow vehicle. If this is a problem, you might consider a roof-top bike carrier.
Hi Mark!
We own a 2019 Fleetwood Pace Arrow LXE. While traveling this past summer we began to notice that the freshwater tank was filling up with water while hooked up to a city source. All the valves are set in the proper position and, in fact, have never been repositioned to fill the tank. The tank only fills up occasionally and not every time we are hooked up to city water. We always use a pressure regulator, inline filter and water softener. Any thoughts you may have on the cause of this problem and a solution to it would be greatly appreciated.
Best regards,
John
Hi John,
The most common cause of that symptom is freshwater leaking back through your 12-volt water pump into the freshwater tank. The pump head has one-way valves in it that are supposed to prevent that, but occasionally one of those valves will get dirty or a small piece of material will stick in the valve and cause it to leak. The next time you notice that the pump is leaking back into the tank, open the fresh tank drain and leave the city water supply on. Remove the inlet connection from the water pump (that’s the one that comes from the freshwater tank) and see if any water is dripping out of the pump inlet. If water is leaking from the inlet, the problem is in the pump. Here’s a simple block diagram of the freshwater system.

Diagram courtesy of Mark Nemeth
The fix is often a simple disassembly and cleaning of the pump head. In some cases, the 12-volt water pump will need to be replaced. If it’s not a huge problem and it’s intermittent, you can live with it, but I’ve found that removing the pump and disassembling it for cleaning is not that difficult a job. All you need is a screwdriver in some time. Shut off the city water and open a faucet to relieve the pressure. Disconnect the pump and remove it, then remove the screws that hold the pump head together and the rest is pretty obvious. Flush the valves out with water, reassemble the pump, and install it and test it for leaks and proper function. If that doesn’t fix the problem, then a new pump is the solution.
Hi, Mark:
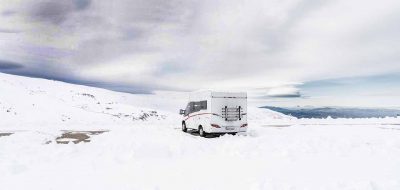
I am spending four months this winter in Lake Tahoe, Nevada, and Breckenridge, Colorado. Two of the RV resorts include electric in the monthly rental. The RV resort in Colorado charges a monthly rate plus electricity. My question: Is it cheaper to heat my RV (29-foot Winnebago Minnie) using propane or electricity?
Thank you,
Tom
Hi Tom,
Manufacturers of electric resistant heaters generally claim that the input of one kilowatt/hour produces about 3,400 BTUs, assuming 100 percent efficiency. Most electric heaters come fairly close to that. Each gallon of propane contains about 91,700 BTUs of heat energy. A typical RV forced-air furnace is probably only about 75 percent efficient, so a gallon of propane burned in the furnace will produce about 69,000 BTUs of heat. If you are operating a vent-free heater, like a blue-flame heater or a catalytic heater, those approach the 100 percent efficiency level. So let’s see now, my calculator says that it takes about 22 KW of electricity to match the heat output of my forced-air furnace burning a gallon of propane. It would take about 27 KW to match my vent-free heater’s output. Armed with those numbers, it’s easy to figure out whether electric or propane is cheaper at your location. For instance: If I’m using my furnace and the cost of electricity is $.13 / KWH, once the cost of propane reaches about $2.85 a gallon, electric starts to be the better value. In the example above, the break-even point would be about $3.50 a gallon if the vent-free heater was being considered.

Death Valley. Getty Images
Mark:
I would like to know how to survive the winter months in the Northeast in an RV. How do you keep water from freezing via the hose even though we have a polarized package RV?
Mike
Hi Mark,
My wife and I are retirees who have decided to go full-timing. I would like to know what has to be done to the motorhome to make it usable in the winter. We plan on spending the winter on Vancouver Island, where the temperature drops below freezing only on a few occasions. Will I have to use a heat tape on the water line coming into the motorhome, and will I need to put anti-freeze in the holding tanks?
Thank you,
Brian
Dear Mark,
We are planning to full-time RV in the near future. What can we do to fully insulate? Piping and undercarriage (close in), not skirting or underpinning. We are open to any advice or suggestions. We’ve also read about others using ceramic heaters instead of their propane heaters because of having to refill the tanks so often. Just need advice over how to stay warm in 30-degree temps.
Thanks,
Bill & Judy
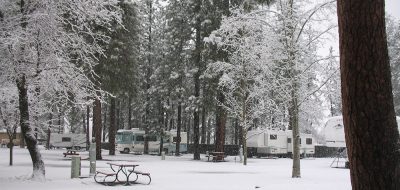
I have received a number of questions like those above. Seeing how winter is definitely approaching, let’s talk about ways to survive the winter in your RV.
Let’s start by keeping that cold weather outside and the warm air in. To do this, you need to increase insulation and reduce cold air infiltration. Your windows are a great place to start. Most RV windows are single-pane, and many do not seal well. Some sort of storm window is needed, and there are a lot of possibilities. Some folks use foam core board to cover the windows from the inside. This works well, but it’s pretty hard to see through! Other folks use sheets of Plexiglass or Lexan cut to fit the windows and held in place either with small brackets, Velcro or tape. This helps seal the windows and you can see through them, but then you will be faced with storing the storm windows during the summer.
A simpler solution is to use shrink film on the insides of your windows. This film is readily available at home supply and hardware stores. It is a clear film that you cut to size and affix to the window frame using double-sided sticky tape. Once the film is stuck down good, you use a hairdryer to shrink it until it is smooth and tight. This not only slightly improves the R-factor of the window, it makes the window airtight. This will eliminate those annoying cold drafts and also help reduce condensation on the insides of your windows. After the winter, you simply peel it off and throw it away. It’s a great, inexpensive storm window and is relatively easy to apply.
Now that the windows are covered, let’s do something about those roof vents. Most vents really don’t seal well, and we all know that warm air rises, so what can we do to stop it? Again, there are lots of possibilities: That same shrink film can be used, or some fiberglass insulation can be cut to fit and held up with a piece of cardboard. There are also nifty little pillows that are designed to fit snugly into the vent opening to seal and insulate it. These are great, as they are easily removed when you want to have the vent open.
Finally, we need to seal all those other places where cold air can enter our rig. Any compartments that open into the inside of the rig need to have good weather seals. Under the rig, there are many openings where water and gas lines enter the living area. These openings need to be sealed, and some of that aerosol self-expanding foam is great for this. Alternately, foam rubber can be forced into gaps to help reduce air leaks. Finally, the entry door needs to be checked to make sure that it seals properly. Adding some inexpensive foam tape or weather-stripping will really help seal those air leaks.
Now that we’ve gotten the rig pretty airtight, we’ve got a new problem to deal with. Moisture from cooking, washing and just our breathing raises the humidity inside the RV. As it gets colder, this moisture condenses out on cooler inside surfaces, like window frames and doors. This can lead to mold and mildew, water stains or even worse. The best way to prevent condensation is to avoid introducing excessive moisture into the air. A good practice is to always use the range hood vent when cooking and the bathroom vent when showering. This will draw most of that moisture out of the rig. It may be necessary to keep a roof vent open slightly to provide some ventilation and keep condensation in check. Insulating exposed surfaces that tend to collect moisture will also help. A small dehumidifier or some of those little tubs of desiccant crystals may be necessary, depending on the RV and how many are living in it.

Photo: Magnascan
This discussion of condensation brings up a related subject: the method of heating that you use in your RV. When propane is burned, it releases combustion byproducts, and one of those byproducts is a surprisingly large quantity of water vapor! Most standard RV furnaces are vented to the outside of the rig and will not add any moisture to the inside air. This is not true of any unvented propane heater, including popular catalytic heaters. Using your stovetop burners also adds moisture to the inside air. If you intend to heat your rig using an unvented propane heater, you will have to provide a larger amount of ventilation to remove the additional moisture added to your air. Most unvented heaters are pretty nice for milder climates and are great for taking that morning chill off. Using them as your primary source of heat in really cold weather can prove to be a challenge because of the potential for condensation problems.
Many folks choose to use portable electric heaters to heat their rig. This method of heating doesn’t add condensation to the air and, depending on the cost of propane, may actually be slightly cheaper to run. Great care must be taken not to overload the wiring in your RV or the electrical system in the campground. Most parks will either put you on an electric meter or charge extra for electric heat. Use only UL-approved heaters and keep combustibles away.
Now that we’re warm, draft-free and, hopefully, dry inside, let’s deal with the stuff outside your rig. The first thing we need to do is keep your freshwater hose from freezing. If you are traveling a lot, simply use the hose to fill your freshwater tank and then disconnect it each night. If you are parked for a longer period, consider heat taping and insulating your water hose. Standard 110v heat tape can be wrapped in a spiral along the length of the hose and then covered with either round foam pipe insulation or fiberglass batting wrapped with tape. Don’t forget to wrap the faucet to protect it, and add a pad of insulation where the hose connects to your RV. In moderately cold weather, this should keep your water flowing. If it gets extremely cold (below zero), it may still be necessary to let a faucet drip overnight.
Sewer lines need special attention in subfreezing weather, too. It’s necessary to support the hose and provide a continuous slope from the RV sewer connection to the park sewer hookup. That way, water will drain from the hose and not create an ice plug at the low point. Alternately, you can use a straight section of thin-wall PVC sewer pipe and the necessary fittings to complete your sewer hookup. The PVC will stand up to cold temperatures better than your plastic hose and is fairly inexpensive.
If your RV has exposed tanks, you may need to take extra steps to protect your freshwater and holding tanks from freezing. In milder climates, where the temperature routinely rises above freezing during the day, you can usually get by with keeping your fresh tank topped up and keep both the gray and black tank valves closed until you need to dump them. If it gets down into the single digits at night and rarely rises above freezing during the day, then you will almost have to drain your freshwater tank to protect it. You will also need to insulate and/or heat your holding tanks or use significant amounts of RV antifreeze in them to keep things flowing. If you are parked for a while, tank insulation for exposed holding tanks can be fabricated from fiberglass insulation and light plywood. Just build a small lightweight box around the tank and line it with fiberglass. A small electric light bulb can be used to provide a safe source of heat. For RVs with enclosed tanks, it’s often enough to provide some source of heat in the tank compartment, and small electric bulbs can be used here as well.
Regardless of your RV’s tank design, if you plan to do a lot of winter camping, look into electric heating pads that are designed for RV holding tanks. They can be purchased from many RV parts dealers or camping catalogs and will allow you to use the holding tanks as you normally would with no fear of freeze-ups. Check out www.ultraheat.com for some examples.