
Howdy !
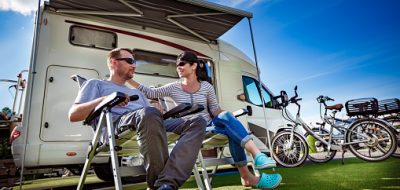
Awnings for recreational vehicles enhance the RV lifestyle, giving us a place to sit and relax in the shade of our carry along porch. Today’s awnings are built of light and durable materials that are engineered to withstand the stress of daily use and a fair amount of abuse however age, accidents and owner neglect do take their toll.
Awnings consist of three major components, the roller tube, the canopy, and the adjustable support arms and rafters. The roller tube assembly is a compact wonder of design consisting of the anodized extruded aluminum tube which supports the weight of the awning materiel. The spring winder unit inside of the tube provides the ability to extend and retract the awning materiel and reduce sagging of the awning materiel by keeping tension on it. Part of the roller tube is the control mechanism that lets the user extend and retract the awning to the desired distance. The canopy of the awning can be as simple as a single layer of cloth or vinyl in an inexpensive awning, or, in the better models, a blended or combined materiel made with a vinyl top layer designed to provide resistance to the bleaching of the suns rays, contains mildew inhibiting chemicals and has a slick coat that lets the rain slide off better while it retards staining and the color coat. A center materiel provides strength and stability to the cover and the bottom vinyl layer which is the same as the top coating. The third part of the awning are the support arms and rafters. These extruded aluminum channels provide the framework for the awning. They must be matched to the side contour of the RV and can be painted to match any color scheme.
Care and feeding of your awning.
Awnings have one major problem in that when the wind comes up they become a sail and can literally fly off the side of your RV. Prevention is the key here. When it looks like it might lightly rain you should lower one side of the awning to allow the water to run off but if it looks to be windy or a heavy rain roll the awning up and secure it to the RV ! A good rule of thumb is to never leave your awning extended unless you are present in case it needs to be taken down.
General maintenance of your awning is straightforward and is easily done by most RV owners. Mildew, for example, attacks acrylic or vinyl and the spores can actually penetrate the cover materiel. This is a common problem and can be prevented by washing the awning with mild soap and water every two to three weeks when the RV is being used. There are also several products on the market designed to prevent and remove mildew from awnings. Be sure to check with the maker of your awning before using any of these products to be sure that they are suitable as some of the cleaners can actually stain the cover. Stains from grease, road tar, pine tar, leaves and droppings from low flying buzzards are another common problem and most can be removed with soap and water. The oily type stains can be taken out with products such as K2R spot remover. Do not use bleach or any type of petroleum product to clean the awning as these can destroy the protective coatings or remove the plasticizers from the materiel and cracks will develop. Be very careful when using the awning in cold weather because the vinyl can easily crack or split.
New awnings often have pinhole type leaks at the seams which will self seal as the awning is used. You need to check the area where the door opens under the awning for small holes or worn places where the RV door has rubbed the cover because the awning is positioned too low to the doorway. Using a roller on the top of the house and screen doors will prevent them from scraping and cutting the awning materiel.
Small rips and tears of the awning materiel can be repaired using products like Vinyl Liquid Patch (VLP) which is good for pin sized to 1/8thinch holes. Somewhat larger holes can be repaired by using Doughboy patch kits. These are the same patches used on plastic wading pools and can be used on awnings holes up to 2 inches in size. If the cover is ripped you can try short term patch by sewing the material together and sealing it with VLP.
Sometimes holes and tears or color fade problems with the awning cover are just to much to deal with and it becomes easier to simply replace the awning materiel. This is much easier than it seems but will require the assistance of one or two other people. First unlock the awning legs but do not extend the awning. Remove the screws that attach the top of the awning to the slide-in channel on the side of the RV. Now unlatch the lower legs and extend them down alongside the RV so the weight of the awning is supported by the legs and not the by the top of the awning. Remove the top brackets that hold the upper arm of the awning to the RV. At this point the awning is held to the RV by a round plastic rod inserted into the awning materiel, which in turn is held captive by a track screwed to the side of the RV. Two people can hold the upper legs and walk to the rear of the RV with the entire awning assembly. The materiel at the top of the awning will slide in its track until the awning is free of the RV. Lay the awning down and look at the front end of the awning roller where the open/close latch is. There will be either a bolt or screws holding the cap on the top of the upper arm where it connects to the awning tube. Remove this cap and take the leg off of the roller tube. Now look at the end of the tube where the awning extension/rewind locking lever is. There will be either pop-rivets or screws holding the end-cap onto the roller tube. Remove the screws or drill-out the pop-rivets and pull-out the spring assembly.
Please use extreme caution here because the spring may still be under some tension and can spin the end-cap as it unwinds when the screws or rivets are removed. Keep your hands and clothing away from the end-cap until you are sure that the spring is completely unwound.
Check to see if there are any screws holding the awning materiel to the roller, and if there are remove them, then slide the cover off of the roller. Slide on the new cover and replace the attaching screws, if any. Reinstalling the awning on the RV is the reverse of when it was removed. On larger awnings you may need a third person to guide the plastic rod at the back into the guide channel along the top of the RV. With the awning reinstalled on the RV you can now adjust the spring tension. Extend the awning fully and attach vise-grips to the rod extending from the end-cap. Take off the upper leg and using vise-grips turn the spring until proper tension is on the spring. Re-attach the upper leg to the roller and remove the vise-grips. What is the proper tension ? To be exact you will have to read the awning makers instructions but in general it is when all sag has been removed from the awning cover while the awning is in its fully extended position.
Hardware problems.
Roller tubes over sixteen feet in length should have a center brace to support the weight. Even with proper bracing the tube can bend to the point where it is unusable. Wind pulling at the awning, water pooled in the canopy or even a bumpy road that delivers a sharp impact to the RV can bind a roller tube. The procedure to replace a roller tube is the same as when we replaced the awning cover. Remove the awning from the RV, take the cover off of the old roller and install it on a new roller. Check the spring unit at the same time and see if it needs replacement. The spring unit can become bent, the spring broken or the mechanism corroded to the point that a replacement is needed.
Outside of the awning cover materiel, the most often damaged part of the awning are the lower legs. These thin walled pieces are easily bent in wind or rain storms. Replacement is simple to do. With the awning in the closed position open the latch at the bottom of the lower leg and extend the leg out of the upper section until it is free. Slide in a new lower leg and latch to the side of the RV and you are done.
Although aluminum hardware does not rust it can be discolored and corroded by SMOG and sea spray. The cure is to wash all the aluminum components with mild soap and water. The use of waxes in the rinse water will also help to prevent these problems.
Light lubrication of the aluminum hardware is recommended by most makers of awnings. Pure silicone spray will provide the lubrication needed without attracting dirt and dust. Do not use any type of lubricant that is not recommended by the awning manufacturer.
What’s that you say, you don’t have an awning and want to put one on your RV? Not a problem. Locate areas on the side of the RV where the legs of the awning can be placed without interfering with cargo doors, latches, vents or other obstructions. The distance between the center line of the leg locations will be the awning length that can be used on your RV. Next check to make very sure that when the upper and lower mounting brackets are fastened to the RV that the lag screws do not poke a hole into things best left alone such as holding tanks, electrical lines and propane pipes. A wise thing to do is to call the manufacturer of your RV and ask them where they normally mount the awning and whether there are any problems or obstacles that you may run into. Now that the leg and mounting bracket location have been identified you need to mount the top guide rail. This piece of aluminum channel will extend along the roof line and will normally be about 12 to 14 inches longer then the awning so that it extends about six inches past the ends of the installed awning. Put Butyl tape on the back side of the rail then screw the rail to the RV with number 10 sheet metal screws using the pre-drilled holes in the channel as a guide. Now round-up two or three friends to assist you in sliding the awning onto the RV the same way as we did earlier in this article. The awning should be centered so that the legs hang down in the locations that you previously measured and marked them to go at. Use Butyl tape to seal the back of the upper and lower brackets and screw them to the side of the RV so that they will hold the legs in the desired position. Connect the awning to the brackets and extend it so that you can check and adjust the roller spring tension.
The newest generation of awnings are fully automatic controlled by what would have been a “Good” PC just a few years ago. Sensors read the wind, rain and tension of the awning material and adjust it without human hands getting in the way. A friend of mine likes to hide the key-fob sized controller for his awnings and amuse the by waving his hands and making the awning go in and out by “Magic”. If somthing goes wrong with these units there isn’t much you can do except take to a awning dealer and get it fixed.
Now all that is left is to extend the legs so that the awning is raised to its shade giving position, get out the lounge chairs and provide refreshments to those kind folks who helped you put on the awning. Enjoy !
Later – –
The Old Ranger
PS: I’ve included some contact info for awning makers and add-ons.
Awning and awning accessories manufactures:
A&A Enterprises Inc 800-342-0751
Amertech Inc 316-722-2774
Carefree of Colorado 800-622-3230
Camco Mfg. Inc 800-334-2004
Dometic Corp (A&E) 219-294-2511
Hold-Awn Mfg Co. 800-235-1631
JR Products 716-633-7565
Quickshade 800-549-1509
Zip Dee Inc 800-338-9727
Chicago Printing Wholesale
Great article… I read this topic, and love to find some great infotmation. If there is more information about this article you will… I do share more… Thanks…
DCRVer
You forgot to mention SHADEMAKER PRODUCTS CORP in Chicago.
Very helpful Technical Support. Replacement awning fabric and parts at great prices.
The phone number is 773-955-0998
:DC
Clarence Mettenburg
How do you tighten the spring tension?
Mike Steffen
Howdy !
Thanks for the kind word Alpenliter !! Glad it did ya some good !!
Later – –
The Old Ranger
Alpenliter
Very good information, Old Ranger! Thanks for a well written, concise explanantion of installation procedures.