
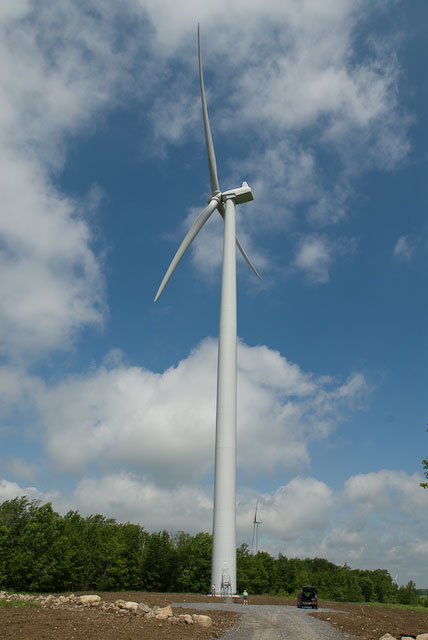
 No, I’m not talking about politically correct lenses, but perspective correction. Most of us have taken photographs of buildings, signs or other tall objects that appeared to lean. The reason? Distortion caused because the bottom of the object is closer to the camera than the top or the camera not properly positioned. The best solution is to move the camera position so that it is centered & perpendicular to the subject. Of course, that is not always possible. In the case of this photograph of a Wind Generator at the Maple Ridge Wind Farm in Lowville, NY, to center on the vertical I’d need a crane that could put me 160′ in the air!
One of the advantages of sheet film or view cameras is the ability to tilt the film plane & lens board. By tilting the film and/or lens board in the opposite direction of the apparent lean of the tower, it would appear straight on the film. Since most non-view cameras don’t have lenses or sensor/film holders that tilt, this solution doesn’t work for anything but a few holdouts still using sheet film. (A side note – since manufacturers of DSLRs have added sensor vibrators to shake off dust from the sensor, wouldn’t it be a nice step to add the ability to temporarily tilt the sensor to duplicate the effect of tilting the film holder in a view camera?)
There are a couple of solutions. For those using a DSLR & willing to spend some money (in most cases lots of money) PC lenses are available from the major DSLR manufacturers. These lenses have screws that tilt part of the lens duplicating the effect of tilting the lens board on a view camera, and are often listed as “shift” lenses. Nikon has recently released a wide angle (24mm) PC lens, the PC-E NIKKOR 24mm f/3.5D ED lens. This is a full frame lens that can be used with both digital & film SLRs that has a street price of around $2000.00. If you want longer focal lengths, 45mm & 85mm PC lenses are also available at similar prices. Canon and other manufacturers also offer similar PC lenses for some cameras. Unless you are an architectural photographer capable of earning enough money with one of these lenses to justify purchasing one, while it is a solution to tilted buildings, it isn’t cost effective.
 For the rest of us, particularly those using point and shoot cameras, software correction is the option. This photo of a Portsmouth Ohio’s Flood Wall Mural could use some correction. Not only is the camera below the center of the mural, but I also stood off to one side rather than moving to the center of the image. Since the street was empty, it would have been possible for me to move so that I was centered on the mural, but there are often times moving would not have been possible. There was no way I could have centered on the height of the image. A PC lens would have been ideal for taking the photograph because the corrections can be made while looking through the viewfinder, however since I don’t have a PC lens I needed another method.
In most cases using software to correct for distortion works well. It may reduce the resolution of your image since the corrections may stretch the data but if you start with a high resolution image it won’t be a problem. How you make the corrections depends on the software you use. Photoshop Elements is an inexpensive (Around $80.00 street price) photo editing application available for both PCs & Macs from Adobe. Basically, you use the crop tool, checking the “Perspective” box next to the Opacity box. After checking the box, you can grab each corner of the crop frame & move it independent of the others. Adjust them so that obvious vertical & horizontal elements of the image are parallel to the crop frame, and use “save as” with a new name so that, if necessary, you can redo it. Here is a tutorial on using it to correct an image. Elements also includes a Lens Correction tool under the filter menu. The filter includes barrel distortion, vigneting and perspective correction tools that can be used along with the crop perspective tool for your final correction. The same techniques can be used in Photoshop (Around $650.00 street price for the latest CS4 version). Photoshop also includes the lens correction tools: Check the “Filter>Distort>Lens Correction menu.
If you use another editor, check the manual for “Perspective Correction”, “Lens Distortion Correction”, “Free Form Crop” or “Transform” for tools that can be used to repair perspective. Not all free software includes the ability to correct perspective so you may need to try a few to find a good tool.
Don’t limit yourself to only correcting perspective distortion that shows up in square & rectangular images. Many photographs can be improved by using perspective cropping. It may not be obvious, but if you tilted the camera or were not exactly perpendicular & centered on the subject of your image, the distortion exists in your photograph. It is often worth experimenting with the crop tool to see the results of a correction. There are also situations where it pays to take a bit of artistic license to add distortion to an image did not need to be corrected. Spend some time experimenting with some of your favorite photographs & the crop tool to see the result.


Pingback: Jasa SEO Profesional
Pingback: WWW
Pingback: Bookmark Links
Pingback: tatuaggi
Mac McClellan
Hi Jon, very interesting and helpful post, as always.
I’ll need to give Photoshop Elements a try. I have been using Corel Paint Shop Pro Photo XI for a couple of years and although it does a good job it’s time to try something new.
Tim Flanagan
Jon—-I have Photoshop Elements, but the easiest and best software solution is FREE and called ShiftN and can be downloaded from the PC World download page. Take a look. Regards, Tim Flanagan