


Building the perfect fire in our campground fire ring is always the highlight of our family camping trips. Not only is it a warm place to sit and share favorite memories of the day’s activities, it’s also where I do most of my camp cooking. Carefully stacking the firewood, using the correct kindling, then lighting the fire and watching the flames consume the logs is a magical experience — it can even result in a delicious berry crumble.
Over the years, I have homed in on my fire-building skills. In the past, I would just throw a few logs into the fire ring add in some kindling and then light it. Half the time, plumes of smoke would pour out of the fire ring or I would continuously be adding wadded-up pieces of the newspaper to get the fire started again. It took taking a Dutch oven cooking class and learning the three firewood techniques to help me with my fire-building skills.


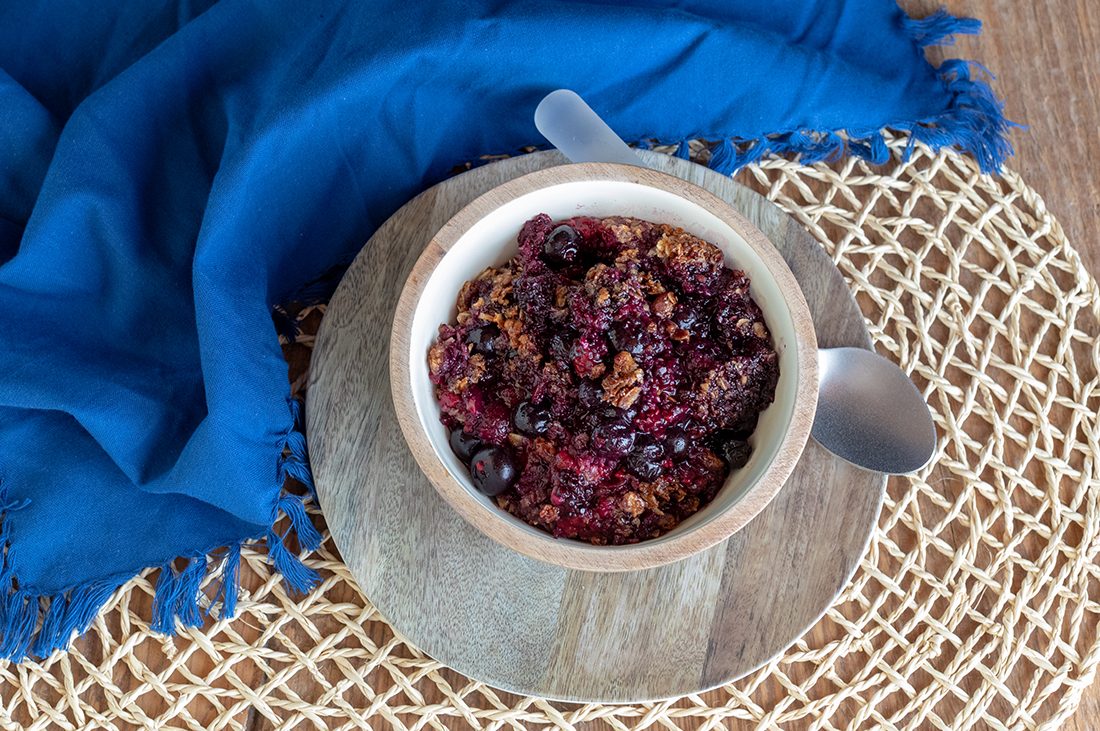
Ready to cook. Photo: Kate Dunbar
Starting Your Fire
The three essential pieces of firewood are needed to create a fire that’s hot, has little smoke and is correct for cooking over the fire.
- Tinder: Dry leaves, dry bark, wood shavings, and dry grass, make for good tinder. This is what you light first in your fire ring wood stack.
- Kindling: Small twigs, bark from your wood logs and branches. This is the firewood that is placed next to the tinder, you want to make sure the pieces of kindling are small in diameter.
- Fuelwood: Aged wood logs that are stacked around the kindling that will catch on fire once the flames reach it. Make sure to not use green wood, meaning wood you have cut from a tree that is still alive. There is too much moisture in the bark, it will rarely catch on fire and produces a large amount of smoke.
Once you have gathered all of your materials for the fire, it’s time to think about building the correct type of fire in your campground fire ring. The three structures are the most popular with campers.
Cone
A fire perfect for cooking over, this fire stack produces a fast and hot fire without a lot of smoke.
- In the fire ring, place your tinder in the center.
- Above your tinder place your kindling in a cone shape.
- Add more kindling to the outer layer of the tinder, continue to keep forming it in a cone shape.
- Add another outer layer of kindling to the cone shape, stacking the small twigs in a vertical pattern.
- Once you feel the structure is solid and secure, add a few pieces of your fuelwood, try to add the smallest in diameter first. Leave some space between the firewood and the kindling so air can circulate.
- Using a long match or long fire starter, light the center of the cone where the tinder is.
- The flames should be centered in the cone structure with the smoke drawing up and out the firewood.
- As soon as the fuelwood catches, carefully place a few larger pieces on the outside. Your fire will be ready to cook over in about 45 minutes.
Log Cabin
The best fire for sitting around and staying warm and doing cooking over.
- Place a small teepee cone mound of tinder and kindling in the center of your campfire ring.
- Imaging Lincoln Logs, those fantastic wooden building toys a lot of us played with as children.
- Find some larger-sized fuel logs and stack them on opposite sides of the teepee starter cone.
- Now find smaller diameter fuel logs and place them perpendicular to the first row on the opposite sides of the teepee. The fuelwood will look like a square with that fire starter bundle in the middle.
- Continue to build layer upon layer with the fuelwood decreasing in size as you build the log cabin structure higher.
- Make sure to place the logs in a tight pattern around the fire starter. If you see there is a large gap, lay a few more pieces of kindling around the teepee structure.
- Using a long match or long fire starter, light the center structure.
- As soon as the structure is 50% or more on fire push the lit logs towards the center and lay fuelwood pieces on top of the fire to continue its burn, the fire should be ready to cook over in about 45 minutes.
Pyramid
The longest burning fire of all the structured stacks. This build is easy, produces consistent heat and will usually need no other fuel added. The typical length of time for this fire is 2-3 hours.
- In the center of your fire ring, place the largest fuel logs side by side. Let’s say East to West.
- The next layer of fuel logs should be smaller in diameter from the base logs. Place these logs in a North to South direction over the bottom layer.
- Adding another layer of fuel logs that are smaller than the layer below, place these in an East to West pattern.
- The final layer of fuel logs, using the smallest diameter of fuel logs, place them in a North to south pattern over the layer below it.
- Add a layer of kindling over the last stacked layer, then repeat placing the kindling in the opposite direction.
- Place a tight compare amount of tinder in the center of the kindling stack. Add a few pieces of kindling in a teepee arrangement to hold the tinder in place.
- Light the tinder using a long match or fire starter, once it catches sit back and watch the fire slowly burn down through all the layers.


A dutch oven filled with berries surrounded by fixins’. Photo Credit: Kate Dunbar
What to Use for Cooking
Now that your fire is lit and everyone is waiting for the evening meal it’s time to decide what cooking equipment are you going to use. Cast iron is the cooking tool everyone envisions when you say, “I’m cooking over the fire.” Made to withstand the heat and flames of a fire, camp Dutch ovens, cast-iron griddles and skillets, along with some wooden utensils are all that you need.
Stews cook best in a camp Dutch oven, steaks sear perfectly in a cast-iron skillet and pancakes and bacon need all the space of a griddle. Below are my favorite pieces to use while I’m cooking over our campfire.


Lodge Camp Dutch oven, Lodge griddle pan and Lodge 12-inch skillet. Photos: Camping World
I’ve created a delicious and simple recipe for you using my favorite piece of cast iron cookware, the camp Dutch oven. I love it for its shape and its functionality. By clearing away the hot coals in the fire ring double the diameter of the pot and then adding a light layer of hot coals to the top of the camp Dutch oven you can have this recipe cooked in 20 minutes or less. In the recipe instructions, I give you hints and tips as to turning the camp Dutch oven base and lid for even cooking. I have also made it easy for you by using frozen berries, the perfect item to keep your food cold in your cooler or RV freezer.

Out of the fire and ready to serve. Photo Credit: Kate Dunbar
Harvest Mixed Berry Crumble
- 36 ounces frozen mixed berries
- 3 cups granola
- 1 stick softened, unsalted butter
- ½ cup maple syrup, divided
Directions
- Build and light your fire in a fire ring, once the coals have burned down push the coals out from the center and clear a space double the size of your Dutch oven.
- Line your camp Dutch oven with parchment paper or aluminum foil.
- Place frozen berries in the Dutch oven, pour ¼ cup of the maple syrup over the berries. No need to mix.
- In a bowl mix the granola, softened butter and maple syrup. Evenly sprinkle the mixture over the berries.
- Place the lid on the Dutch oven and carefully use heat-safe gloves or a Dutch oven lifter and place the pot in the center of the cleared fire. Add a light layer of hot coals to the top of the Dutch oven’s lid with a shovel. Set your timer for 5 minutes.
- When 5 minutes passes, carefully take your lid lifter and hook the wire cable handle, give the Dutch oven a half-turn, then take the lid lifter and turn the lid an additional ¼ turn. Set your timer for 5 minutes and repeat the process. Except for this time before turning the lid, remove it to check the progress. If the berry mixture is not bubbling, and the granola is not too brown, place the lid back on and cook an additional 5 minutes then check again. If the berry mixture is just starting to bubble, but the granola is getting too brown, knock off all the coals on the lid and replace it on the Dutch oven. Continue to cook and rotate in 5-minute intervals until it is bubbling away.
- Remove from heat, carefully remove the lid and allow to cool for 15 minutes before serving.