

Over the next couple of blog entries I will discuss some of the terms & camera modes that are available on most cameras. Many of these are automatically set by your camera, but many can be overridden by the photographer. Setting your own values can often improve the final image. Of course some settings may not be ideal for the situation – a big advantage of digital cameras is you are not using film – all you will waste experimenting is time. Let’s start with ISO.
ISO stands for International Organization for Standardization. Click the link if you are interested in more information about the organization, however the letters do not stand for anything specific to photography. The organization produces standards for anyone willing to pay for them. The term ISO has replaced the term ASA, previously used with film.
ISO describes film speed or sensitivity – how much light it takes to produce an image. When used with digital cameras it is an equivalent used to describe the sensitivity of the camera’s sensor. The larger the number, the less amount of light needs to strike the sensor to produce an image. Typical ISO’s for Point & Shoot cameras go from 50 – 400. Digital single lens reflex cameras (DSLRs) usually include higher (faster) ranges, 100 – 1600 +.
The method most often used to increase ISO is to amplify the electrical signal produced by the individual elements of the sensor. This creates a problem – the more you amplify the information produced by the sensor, the more noise you add. Unless you can keep the noise invisible, your images will have the same appearance as those taken with high ASA/ISO film – a grain or noise pattern that becomes part of the image.
If you can reduce the noise, you can increase the ISO of a camera. Some methods that can be used to lower noise include using a larger sensor such as those often found in DSLR cameras (it produces a stronger electrical signal from the same amount of light), lowering the temperature of the sensor (in some cases cameras used for scientific purposes have electrically or liquid nitrogen cooled sensors) or by using better quality amplifiers that produce less noise during the amplification process (raising the cost of the camera).
Read more to learn how to use ISO settings to improve your photographs.
As the photographer, it is generally best to use the lowest ISO possible. Unfortunately, some cameras don’t allow the photographer to select the ISO – they do it automatically. Even if you can choose the speed, there are trade offs. If you select a low ISO, for example 100, you will need more light than if you select a high ISO such as 400. If the proper shutter speed at ISO 400 is 1/60th of a second, at ISO 100 it will need to be 1/15th. It may be possible to take a picture at 1/60th of a second without camera shake blurring the image – few photographers will be able to hand hold a camera at 1/15th of a second. Another problem – at lower ISOs, you flash may not provide enough light, resulting in dark images.
The simple solution is to leave your camera on automatic, however in situations where you can live with a slow shutter speed, for example when the camera is on a tripod, manually lowering the ISO will often improve the quality of your image.
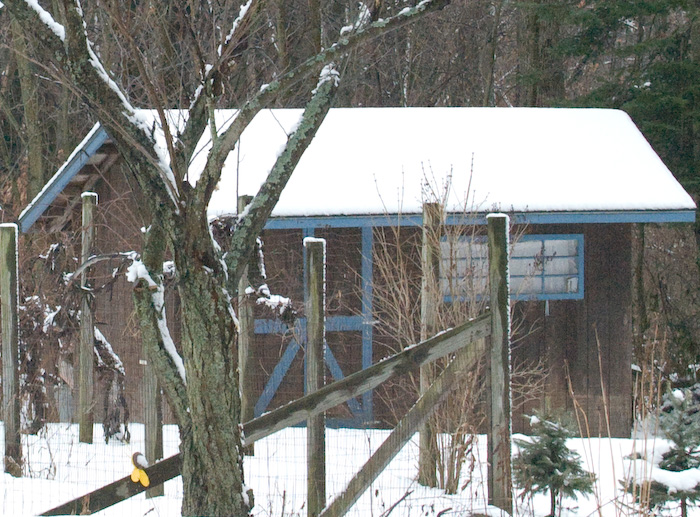
If you wish to take advantage of controlling the ISO of your camera you need to first determine how to set it. Check your camera’s manual. If you have misplaced it, check with DigiCameraHelp. Although they don’t have links to the manuals for all cameras, it is a good place to start. Once you have found out how to change your camera’s ISO settings it would be a good idea to make some sample exposures so that you know what to expect. Shoot the same image at each of the available ISOs. The noise or grain will show up as colored dots or unevenness in your image, particularly noticeable in areas such as skies. An example of the same image shot at ISO 100 & ISO 1600 is below. Compare the boards on the right side of the shed – the ISO 1600 image contains more noise seen as color specks or dots. The noise is also visible in the tree branches. If you are having a problem seing the difference, a larger 700 pixel wide version of each image is linked from my website – click on the image to view it.
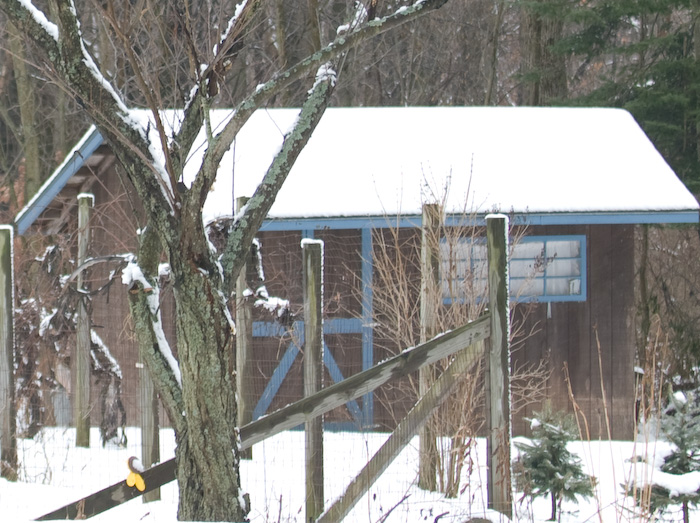
ISO at 100
Once you determine the ISO settings that are acceptable to you it will be possible to increase or decrease the value to help control shutter speed. You may find increasing the ISO lets you take images indoors without flash, resulting in more natural lighting. If you need to freeze movement when taking photos of sports or other fast moving action, higher ISOs will allow shorter shutter speeds reducing blur. Higher ISOs are also useful when you can’t use a tripod and must shoot hand held under low level lighting. Finally, by controlling ISO settings you can often force an otherwise automatic camera to select a shutter speed or aperture of your choice. I’ll discuss the advantages of controlling shutter speed & aperture in later entries.