


Hi Good Sam Readers! For the Mark My Words December post, we’ve got questions on water heaters, propane tanks and prepping for a trip. Remember to send your RVing questions to mmw@escapees.com.
Hi Mark,
I have a 2017 trailer and am having a problem with the propane getting to the appliances. I have plenty of propane in the tanks, and they are in the “on” position but still no flow. Could the regulator on the propane tanks be the problem? Any way that I can troubleshoot it?
Thanks,
Tom


Hi Tom,
It could be the regulator. Turn both tank valves off and make sure that both tanks actually have propane in them. Then, check to be sure that all propane appliances are off in the rig. If you have a propane detector in the rig (most do) make sure it’s on and not in a fail or alarm state. Turn both tank valves on and flip the tank selection lever on the regulator assembly back and forth a couple times, and then leave it either fully to the right or left. Turn on a stovetop burner and see if you have gas flow. If not, turn the stovetop off and flip the tank selection lever to the other tank. Repeat the stove test. If you get gas on one tank and not the other, then the connector hose to the tank that doesn’t work may be plugged up, or there may be a problem with the tank itself.
If you’re not getting any gas flowing on either tank, then I’d suspect the regulator first. It could be something else, like a blockage in the line, but regulators do fail. They are pretty easy to replace, and most RV parts places will have one that fits your rig. After the regulator is replaced, be sure to check all connections for leaks. With the gas on, brush or spray a mild soap and water solution on each fitting. Any leaks will show up as bubbles in the soapy water.

Hello Mark,
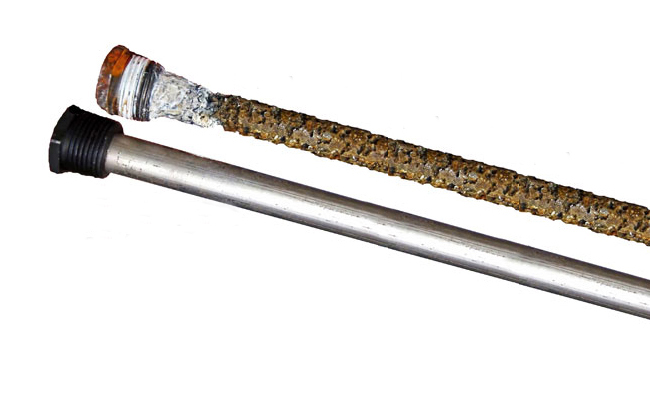
Can you explain what the water heater diode does? Upon winterizing, we removed ours and found it quite corroded. How do we clean it? Or should we just replace it?
Best Regards
Sue
Hi Sue,
I think you’re referring to the anode rod in the water heater. An anode rod protects the water heater tank by sacrificing itself to protect the exposed steel in the water heater tank. Through a process called electrolysis, it delivers electrons into the tank that prevent galvanic corrosion (rust). Those rods are a consumable item. In other words, as they do their job, they slowly erode away. If more than 50 percent of the original material remains, you can re-use it; otherwise it should be replaced. You can get them online, or at most any RV parts store. Be sure to note the make and model of your water heater beforehand, so you get the correct rod. It’s a good idea to check the anode rod annually in heaters that are equipped with them. All steel tank water heaters have them, but they are not used in certain Atwood heaters that have aluminum tanks.
Hi Mark,
My water heater has died after 18 years of service. I’ve noticed that there are “on demand” water heaters for RVs. My question is: should I replace my heater with a “normal” unit or go with the on-demand system?
Thanks,
Frank

While it is probably simpler to just replace your existing heater with a similar model, some RVers are opting for tankless, on-demand heaters for their RVs. Like anything, there are pros and cons. I suspect that most folks who buy these heaters do so to get the endless supply of hot water: no more navy showers! As long as you have a fuel supply, they will provide an endless flow of heated water. These heaters also tend to be quite fuel-efficient, as you are only heating the water you are actually using.

However, since most tankless heaters use a high-output propane burner to rapidly heat water passing through a heat exchanger, they have some limitations. First, the faster the water passes through the heater, the less heat it picks up. Most heaters require you to limit the flow to get a decent temperature rise. Also, as the water coming in gets colder, the water coming out will not be as hot. These heaters are rated for a set temperature rise at a given flow rate. If the heater is rated for, say, a 50-degree temp rise at a flow of 1.5 gallons per minute, then it will raise the temperature of incoming 60-degree water to 110 degrees. If the incoming water is 40 degrees, it will only produce an output temperature of 90 degrees. This is one of the limitations of the design, and if you will be using this heater in a cold climate where the incoming water is frigid, it can be a problem.
There are two on-demand heaters that I’m aware of that are designed to be a drop-in replacement for an existing RV water heater. One is the RV-500 unit made by Precision Temp. The other is the Girard Products’ GSWH-1 Tankless Water Heater.
Mark,
We are only able to travel in our RV occasionally at this time, and the day before we leave is always so busy getting everything loaded in spite of having a stocked kitchen, bath, etc. When we get home, it’s always busy again getting clothing, bedding, etc. unloaded. Does everyone have this issue or are we doing something wrong?
Sue
Hi Sue,
It’s kind of like eating a Reese’s cup… there’s no right way or wrong way to RV… you should do it the way that works the best for you. When I bought my first RV, a slide-in pickup camper, the first thing I did was organize a complete set of dishes, cookware, linens, toiletries, cleaning supplies and utensils that could stay in the camper. The more stuff you keep in there, the less loading and unloading you have to do. I also created a checklist for loading the camper, which really helped to speed up the process. If you do it right, you should be able to load food and clothes and go! When you get home, you can take your time with things like washing towels and linens, and when they are clean, back into the rig they go. If you’d like to see some checklist examples, visit my website or check out Good Sam’s checklist.
Mark,
I read a recent question for repairing a small crack in the overhead vent window, and you suggested tape. I’ve had good results mending cracks and even small holes using baking soda and super glue. First, clean the crack or hole, spread the baking soda to fill the crack and drip in CA glue (super glue) on the soda. Within seconds the repair is complete, works on most material, even cracks in gas cans.
Marty