

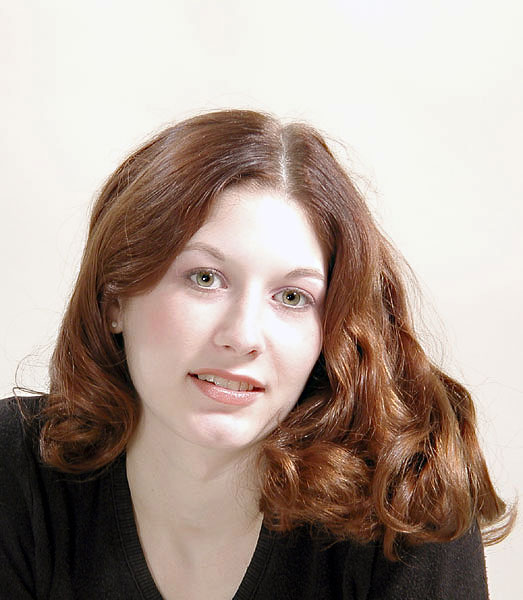
In Portrait Photography – Part 1 I covered information about lenses, and some basic information about lighting. Again, the main difference between a snapshot & a portrait is lighting. You can certainly take a wonderful photograph of someone without paying attention to lighting, but a portrait involves posing the subject, positioning the camera & arranging the lighting to complement the shape of the model’s face. In this example, which I have to admit has a slightly overexposed forehead and cheek, the model was quite thin. I used the combination of the lighting and camera position to add width her face. The general name for the positioning of the key and fill lights is called Broad Lighting. The key or main light is positioned so that it illuminates side of the model’s face that faces the camera. It tends to widen a thin face & soften facial features.
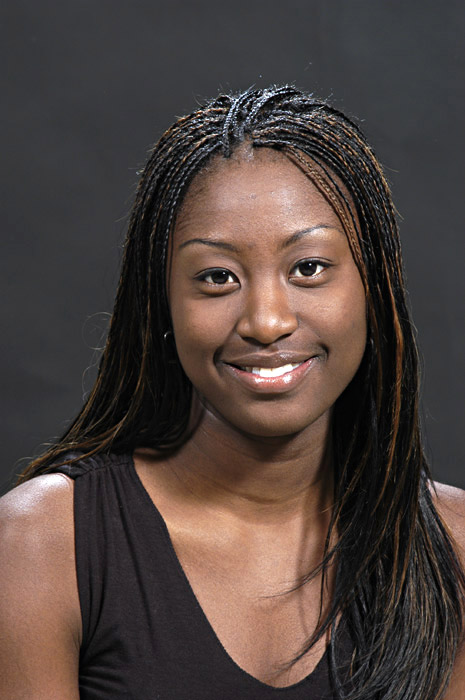
If you have model with round face, simply moving the key or main light to the side of the face away from the camera emphasizes facial features & narrows the face. This is called Short Lighting.
Another technique is to position the key or main light behind or very close to the camera & slightly above the model. Properly positioned lighting will produce a soft, butterfly shaped shadow below the nose giving the technique its name – Butterfly Lighting. This style of lighting is often used for women with a normal oval face, and is often referred to as “Glamour” lighting. Two other less often used lighting styles include High Key & Rembrandt styles. Rembrandt lighting comes from the style used by the artist in many of his painted portraits. The key or main light is positioned high above the model on the of camera side (as in short lighting). This can be a very dramatic style of lighting and requires careful control of the fill light – to much & the effect is lost, too little & the shadows caused by the nose & eye sockets can be distracting.
High Key lighting is one of the most difficult styles to handle, but produces striking results, particularly with women. The lighting setup is similar to that that produces Butterfly Lighting, however in a true high key image the exposure values are moved as far to the right of your camera’s histogram as possible without overexposing. In the case of a blond, the only part of the image that falls below mid tones would be the pupils of the eyes. There should be little or no shadowing on any part of the subject. Lastly, the background should be lighted so that it appears pure white. Again, this is difficult to control but it works well for babies and women with light hair. I have rarely used it on men – when the key light is positioned close to the camera, men’s ears tend to stand out…
Although these are terms for specific lighting techniques, most photographers use combinations of them. Changing the height of your key or main light is useful. Lower positions tend to work better for men, higher for women. Watch the effect of the shadows created by the nose & the shadowing in the eyes created by the brow ridges – if you lose the eyes, the portrait is generally going to be useless.
The amount of fill is important. Too much fill light will wash out the sculpturing you are trying to accomplish with your lighting techniques. Of course, in some styles, such as high key, you want to eliminate shadows and sculpting so a strong fill is necessary. In other techniques you will find keeping your fill light 1 – 2 stops below the key light works well. For dramatic Rembrandt style lighting, 3 stops or more may be necessary. If you find the shadow detail falls off the left side of your camera’s histogram, you need to increase the fill level. Unlike natural lighting, which may exceed the dynamic range of your camera, in a portrait you use the combination of key & fill to limit the lighting range to your sensor or film. A big advantage of using a digital camera is the availability of the histogram to check exposure.
I prefer to start with my key or main light. A good starting point is 45° off the camera position (the camera at 0°). Most photographers work within the range of 30° to 60° off the camera position, so you don’t need to be exact. Choose the location depending on the style of lighting (Broad or Short) you are starting with. A starting height is 10° – 15° above camera level for men, and a little more for women, although going as much as 30° above the model will work. For Rembrandt style lighting you can (and should) go higher, however it is important to use a soft source to reduce shadows. You want to avoid strong shadows of the nose hitting the lips. As to the camera, I like to start slightly below the model’s face for men & slightly above for women. Again, there are many exceptions that can be used to correct for facial features, hair (or lack of it) etc.
Next I add my fill light. The fill light is used to keep the shadows from being too strong. If you find you are using it to erase badly located shadows from your key light, stop & reposition the key – it should be used to control shadows, not eliminate them. I tend to use less fill for men, and more for women and children. I generally position it on the opposite side from the key light & close to the camera. In a studio working with strobes, setting levels is easy. They generally have power level controls set in stops, so you just dial what power levels you want. Since most of us don’t have studio strobes, we will be using incandescent lighting. Remember the inverse square law with lighting – move a fixture twice the distance from the subject gives you one fourth the amount of light. Use distance to control the fill to key ratios. One additional point – the closer a fixture is to the subject the softer the shadowing it causes. Too close, and the inverse square law starts to cause problems. If your model moves even a few inches when working with close lighting sources, the change in levels can cause problems. It is generally better to move all the fixtures further away & use frosts or reflectors to soften the source.
The hair light is next. I generally position the hair light behind the subject & from the same side as the key. Be careful that is doesn’t spill onto the face of your subject – it is easy to turn your model’s nose into a beacon with spill! Depending on your background, you may want to also use your hair light to help isolate the model. Again, too much will turn your model’s head into a glowing ball – dramatic, but not realistic.
Finally, the background light. This is not always necessary. If you want your model to appear floating in the air against a black background, use the background light as a “kicker,” a light aimed at the subject from the back. It will light the edges of the subject, isolating it in a void. If you do have a background to light (a sheet, wall, blanket, etc.) the amount of light you pour on it will determine how much you isolate your subject. What you most want to avoid is providing just enough light to give it the same value as your subject. If you do that, your subject may melt into the background. Either light it brighter so it becomes a white void, or darker so that the hair & kicker lights isolate the subject. I try to avoid backgrounds that have a pattern, but if your does and you don’t want it to dominate, use a shallow depth of field and position your model far enough in front of the background to throw it out of focus.
An excellent web site for samples & more information of taking portraits is Benji’s Studio Lighting & Posing Tutorial. Remember, these techniques are usually demonstrated with people, however they work well for pets, shooting a still life, and many other situations.
Although I no longer have access to a studio to produce images that illustrate some suggestions for posing, lighting & camera positions, I have copies of the out takes of some of the portraits I took of actors for theatrical productions prior to retiring. Rather than turn this into a huge page (well, any larger than it already is) I’ll post them to my website – here is a link. This is a 1.69MB page – if you have a dial up connection it will take a couple of minutes to load…
I don’t pretend to be a portrait photographer – although it was part of my job prior to retirement, I did not (and still don’t) enjoy taking formal portraits. In any case, I hope these suggestions & examples will help you when taking portraits.