
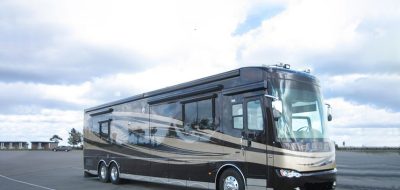
When the slide-out room was introduced, it revolutionized the RV industry. The benefits changed the floor-plan game — manufacturers could create new and exciting layouts to attract customers, while potential buyers were lured by the “like home” attributes of these new RVs. Soon came double, triple, quad slide-outs and today, full wall slide-outs have become commonplace.
Though slide-out rooms were once an exclusive attribute of high-end motorhomes, today they can even be found on some smaller, entry-level units. Indeed, slide-out rooms have become an integral part of the RV lifestyle, and as such, it behooves you to learn a little bit about them, and how to ensure their reliable operation for as long as you own your trailer or motorhome.
First and foremost, not all slide-outs are created equal. Though there are still two basic categories, electric and hydraulic, electric slide mechanisms are far and away the more popular type in today’s RVs, because they’re less expensive and easy to install. That said, about the only thing electric slide systems have in common is their power source; each slide system manufacturer has its own unique drive system, be it rack and pinion, screw drive, chain/cable or some other design.
Fortunately for you, the slide-out owner, all of these different systems have been designed with one goal in mind: maintenance-free operation. In most cases, there’s nothing that needs service on a regular basis, because the gear motor is sealed, and permanently lubricated bearings are employed. Moreover, none of the critical components are exposed to the elements by design, so there’s no risk of dirt contamination or corrosion.
Regardless of the system your coach has, one thing you can do is inspect the slide-out’s wiper seals. Make sure there’s no dirt or mud around the room, and wipe dirty seals clean with a wet towel when needed. Most of the manufacturers we spoke to say that’s all that is necessary–as long as the room can move in and out smoothly, no lubricants or other products are required.
Fortunately, keeping dirt down to a minimum is something all of us can handle. If you’ve been on an extended stay with the slide outs deployed, always check for dirt, sand, pine needles/leaves and other debris before breaking camp. Most slide-outs are equipped with “slide topper” awnings that keep the bulk of damaging dirt off the top side, but you need to check the sides of the room as well. After storage, run the rooms in and out. Clean them carefully with a pressure washer or high-pressure hose to remove any dirt or sand that may have accumulated.
In most instances, you won’t have to address the bottom of the slide room, but there are exceptions. For example, if you’ve recently experienced a dust storm in your campsite, you might want to examine any external components for contamination, and wipe off any dirt you see with a clean rag. One thing slide manufacturers don’t want you to do is spray anything with a degreaser. Some systems use lube-impregnated bearings, and a degreaser can break down the lube inside of them and damage other parts. If you want to clean the parts off, spray a small amount of degreaser on a clean rag and wipe them down.
If you do choose to clean the exposed components, you’ll wipe the lube away with the dirt, so you’ll need to replace it. Heavy-duty bearing grease can be used on gears, actuators and screw mechanisms, while white lithium spray grease will suffice on lighter-duty components. An RV repair center or dealer service center can tell you what to use if you’re in doubt.
More often than not, a lack of basic common sense is what most often causes damage to a slide-out or system. When extending or retracting a slide-out, watch the room from inside and out to make sure there are no potential hazards. That means broom handles, ladders, bikes, etc. on the outside, and area rugs and other items on the inside that can jamb the slide as it is retracted.
Another, less obvious cause of slide-out damage occurs when the slide-out is deployed before the coach is leveled. On uneven ground, the coach’s chassis can twist, creating slide openings that become out of square. It’s not hard to imagine what happens when a square slide room tries to exit an opening that isn’t. Many newer coaches are equipped with an interlock feature that prevents the slides from deploying until the coach is level, but earlier and/or entry-level models may not have this feature. If this describes your coach, place some sort of a reminder on the slide control, such as a note, that tells you to level first, slide later. Even if you already know this, someone else in your coach may not, and it only takes one time to cause significant damage.
If you find yourself in a worst-case scenario, and the slide room ceases to function, what can you do? The good news is, every power slide mechanism we’re aware of has some way to at least manually retract the slide—after all, you can drive with a slide that’s stuck in, but not one that’s stuck out. Take some time now to find out how your slide(s) can be manually retracted if necessary, and save yourself some stress if it happens to you on the road.
A word of caution: Manual slide retraction should be considered an emergency measure, and you should seek immediate repair to prevent further damage. Re-deploying the slide manually can damage the mechanicals, as the load may not be balanced from one side to the other.
Like any other component in your coach, slide-out rooms can provide you with years of reliable service—and all you have to do is pay attention to them once in a while.
Article by Chris Hemer.


Doug
My lap sealant has shrunk tremendously and I want to replace. Applying new sealant looks easy, how do I remove the old sealant?
Good Sam says: That’s a good question. I have sent this to [email protected], to ask the experts. You also might want to check the Forums as they are another great source of information.
Egrum
Hi All
Well we just home from 4 weeks in our Sunset Trail 26BH. We live in Alberta and made a trek all the way down to Florence Oregon and came up the coast looking at all the sights, WHAT a BLAST.
In the last RV park the trailer was not level when I tried to run the slide in, I had done this before, not quite this crooked but the slide had operated. This time absolutely nothing, like no power, I checked all the electrical, read the manual and was trying to determine where the manual crank point is/was. I was actually thinking I needed to remove the entire bottom covering, then I thought I would try levelling the trailer, or at least close, when I did this and pushed on the slide itself, with the help of a fellow camper the slide did manage to come in. I was very relieved, although had much trepidation every time I needed to extend and retract the slide for the rest of the trip, another 4 days, plus emptying the tanks.
So my question is:
Where would the manual crank connect to?
Is it hidden under the bottom cover? Surely no engineer would do this as a “best practise”.
I have seen other campers using a manual crank to extend and retract their slides.
I also know that I will not be caught in a camp ground in a pouring rain storm, or a +90 degree day wondering where the crank point is.
Does anyone know?
2nd Post
Let me tell you what steps I took with your replies.
1st I started to look for the 2 manufacturers of slides,,, Lippert and Schwintek. I believe through my searches I discovered that Lippert has purchased the Schwintek company or at least their technology.
2nd I searched further, mostly You Tube, for more information on the 2 manufacturers, primarily Schwintek as I discovered a video that talks about their technology and the “worm rail” I think the link below is the one that I am referring to:
http://www.youtube.com/watch?v=DTq9__hWWS0
Our unit has 4 of these rails one each on the top and bottom on each side of the slide.
I searched further and found more videos talkng about the Lippert slide using these types of rails and how they are far superior to any other system. The link below is this one.
http://www.youtube.com/watch?feature=endscreen&NR=1&v=wHPi6Y-WiNo
3rd I found an owners manual which I was able to download and print, we have that manual for the dealer, however it appears that they forgot to add toner to their printer as one can hardly read it. I was trying to read it when we were stuck but I got more frustrated from the lack of ink and I quit as well we managed to get the slide in about this point, my wife was reading trying to find crank point.
This link is one for all manuals by the looks of it:
http://lci1.com/index.php?option=com_content&view=article&id=174&Itemid=103
This link is for what I believe is our slide:
http://lci1.com/images/Flyers/Owners_Manuals/slides/om-schwintek-in-wall-slide-out-system.pdf
This link is the Operation and Service manual for ours:
http://lci1.com/images/Flyers/Owners_Manuals/slides/InWall%20Service-Web.pdf
Finally I found a video that talks about the controller, which we have, error codes on the LED read out and how to over-ride the slide.
http://www.youtube.com/watch?v=ymt1Uesf0Pc&feature=relmfu
Hope this helps someone else out there.
The bottom line is we do not have an manual crank, don’t know why there is a handle.
Manual cranking is not an option, one must disengage the motors and use man power to close the slide and
BE SURE TO BLOCK IT FROM THE INSIDE FOR TRAVEL.
It would be ugly to hit that first right hand curve on the inter-state and look in the mirror and see the entire slide drifting out of the side of your trailer.
That one piece of information is worth its weight in gold for the unassuming, frustrated camper returning hole let after finally getting their slide into a travel position. Plus I now understand why the slide does NOT require some sort of locking system when travelling.
Again thanks for all your help and suggestions.
Happy Trails..
Ernie
Thanks
Ernie
Bev Aicken
we purchased a brand new 2011 Sydney outback 36 foot 5th wheel. This is our 6th 5th wheel…so we know what we are doing. The only problem with this unit is the cold water in the bathroom sink. It has a foul sulpher smell when we run it. any ideas as to what is causing this problem??? Happy
Thomas Shuler
On Tuesday, July 17 we were traveling on Route 50 in Stevensville, Md when we decided on stop in the Cracker Barrel for lunch. After parking our rig – 03 Dogde Diesel Pick up and 27 ft travel trailer – water began to leak from the truck. We called Good Sam Road Service and they arranged service. However the total time to get us hooked up and towed was about 5 hours. During this time, with temperatures about 100 degrees, the personnel at the Cracker Barrel made sure we had water and iced tea and one employee – Patti – even offered use of her truck for air conditioning to keep our little dog cool. Hats off to Cracker Barrel. As to the 5 hour time frame, this was addressed with Good Sam. I am sure this will be addressed internally and we remain loyal Good Sam members and policy holders.
Good Sam Says: Kudos to the Folks at Cracker Barrel and especially Patti.